Make this bold and zesty Nando’s Peri Peri Sauce copycat recipe right at home using fresh chilies, garlic, lemon, and smoky paprika. It’s spicy with a citrusy kick and just the right balance of heat and flavor. Perfect as a marinade, dip, or drizzle—this homemade sauce turns everyday meals into something seriously tasty.

If you’ve ever wondered what gives chicken that unforgettable zing at your favorite spot, it’s time to unlock the secret with this Nando’s Peri Peri sauce recipe.
Imagine a sauce that isn’t just about heat—it’s a love letter to flavor: fiery African Bird’s Eye chilies, zesty lemon, bold garlic, and that smoky kick people rave about online.
Fans can’t stop pouring it on everything, from grilled meats to veggies, and they’ll tell you it’s “magic in a bottle” you’ll want to put on your “last meal.”
It’s simple, homemade, and honestly better than store-bought. If you’ve been looking for that “magic-in-a-bottle” kind of sauce, this one just might be it.
Why Nando’s Peri Peri Sauce is So Popular
Nando’s Peri Peri Sauce has become a favorite for people all over the world because of its spicy, tangy, and bold taste. The word “Peri Peri” comes from African Bird’s Eye chilies, which are the main ingredient in this fiery sauce.
This chili packs a punch, but when it’s balanced with lemon, garlic, and smoky spices, it turns into something you just can’t stop eating.
Many folks love this sauce because it brings out the flavor in grilled meats and roasted vegetables without overpowering them. It’s a little spicy, but not just heat—there’s a real depth to it.
The mix of lemon zest, smoky paprika, and vinegar gives it that signature kick. Plus, making it at home means you can adjust the spice level to your liking.
What is in Nandos PERi-PERi sauce?
- 1 medium yellow onion – I use this for a sweet, mild base that blends well and adds body to the sauce.
- 7 garlic cloves, peeled – Fresh garlic brings that deep, savory punch I love in every homemade sauce.
- 6–8 bird’s eye chilies (red and green mixed) – These bring real heat and a little fruitiness; I adjust depending on my mood.
- 1 serrano chili (optional) – I toss this in for a richer flavor if I want the sauce a bit deeper and bolder.
- 1 whole lemon (zest and flesh, peeled and seeds removed) – This gives the sauce its zingy brightness and a fresh citrus bite.
- 2 tablespoons tomato paste – Adds a nice thickness and a sweet, rich tomato flavor that ties it all together.
- 1 tablespoon smoked paprika – This gives it that warm, smoky layer that really makes the sauce stand out.
- 1 teaspoon dried oregano – Brings in that earthy, herby flavor that plays well with the heat and citrus.
- ½ teaspoon dried rosemary – Just a little gives it a woodsy, cozy flavor that’s subtle but lovely.
- 1 tablespoon dark brown sugar – I like using this to mellow out the heat and add just a touch of sweetness.
- 1½ teaspoons salt – Balances all the flavors and helps everything pop, plain and simple.
- ¼ cup white distilled vinegar – Adds that tangy bite that makes the sauce bright and bold.
- ¼ cup water – Helps everything blend smooth without thinning the flavor too much.
- ⅓ cup neutral oil (like canola or sunflower) – This makes the sauce creamy and helps it blend nicely without adding flavor.
How To Make Nando’s Peri Peri Sauce
Step 1. Prep the Fresh Ingredients
Start by peeling and chopping the onion and garlic. Zest the lemon, then peel and remove any seeds from the lemon flesh.
Step 2. Add Everything to the Blender
Toss all the ingredients into your blender.
Step 3. Blend Until Smooth
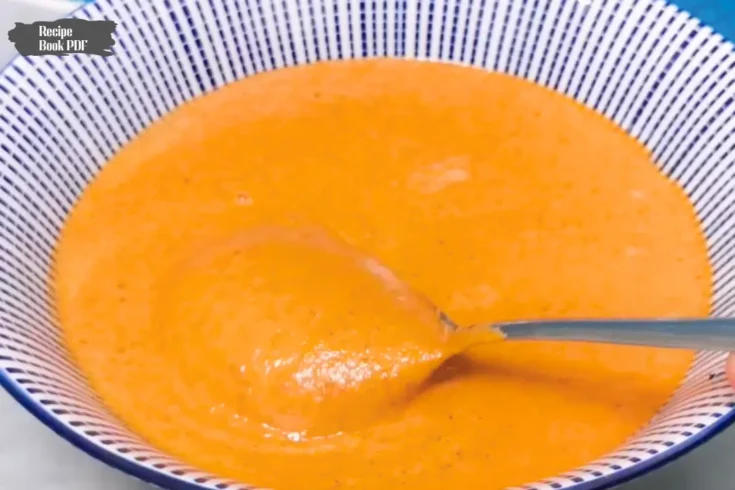
Blend it on high for about 1-2 minutes, or until it becomes thick, smooth, and bright red-orange. If the mixture is too thick to blend, you can add a little more water or oil to get things moving.
Step 4. Taste and Adjust
Give it a quick taste—but carefully! It’s spicy. If it’s too hot, you can add a little more sugar or oil. If you want it tangier, add a bit more vinegar.
Step 5. Optional: Simmer the Sauce
I like to pour the blended sauce into a small saucepan and let it simmer on low heat for about 3–5 minutes. It helps blend the flavors better and gives it a slightly thicker texture. This step isn’t required, but I think it makes a big difference in taste.
Tips for Making Perfect Sauce
Here are some quick and handy tips I’ve picked up while making this sauce over the years:
- Use fresh chilies for the best flavor and heat.
- Adjust the heat to your taste by using fewer chilies or removing seeds.
- Simmering is optional, but it deepens the flavor nicely.
- A high-speed blender makes it extra smooth and creamy.
- Don’t skip the lemon zest—it adds a bright, fresh note that lifts the whole sauce.
- Store in a clean glass jar for better flavor and freshness.
How I Like to Use or Serve This Peri Peri Sauce
I keep a jar of this sauce in my fridge almost all the time. It goes with so many things! I love brushing it over grilled chicken or tossing roasted veggies in it.
It’s also amazing mixed into mayo for a spicy sandwich spread. Sometimes, I even stir a spoonful into soups or stews to give them a little boost of flavor.
You can also use it as a marinade—just coat your chicken or shrimp in the sauce and let it sit for a few hours before grilling or roasting. It really soaks in and gives you that delicious Nando’s-style taste.
How to Store and Reheat This Nando’s Peri Peri Sauce
Once your sauce cools, pour it into a clean jar or bottle with a tight lid. I usually use a mason jar. Store it in the refrigerator for up to 2 weeks. You can even freeze it in small containers or ice cube trays for longer storage—just thaw and use as needed.
To reheat, I usually just spoon some out and warm it gently in a saucepan. You don’t want to boil it—just warm enough to loosen it. Sometimes I add a teaspoon of water or oil if it thickens too much in the fridge.
Nando’s Peri Peri Sauce Recipe FAQs
1. Is this sauce really spicy?
It can be pretty spicy, but it depends on the number and type of chilies you use. You can always reduce the number of bird’s eye chilies or skip the serrano to make it milder.
2. Can I use dried chilies instead of fresh?
You can, but the flavor and texture won’t be the same. Fresh chilies give the sauce a brighter taste and smoother finish. If using dried, soak them in hot water first to soften.
3. Is this the exact same as Nando’s sauce?
It’s very close in taste and texture, but since Nando’s keeps their exact recipe secret, this is my homemade version that comes pretty close.
4. How long does the sauce last in the fridge?
It keeps well for about 10 to 14 days in the fridge if stored in an airtight glass jar.
5. Can I freeze this sauce?
Yes, you can! Freeze it in small batches and just thaw what you need. I like using silicone ice cube trays to portion it out.
6. Can I use olive oil instead of neutral oil?
I don’t recommend it for this recipe. Olive oil has a stronger taste that might overpower the other ingredients. Stick with canola or sunflower for a more balanced flavor.
7. Is the simmering step necessary?
No, but I recommend it if you have time. It brings all the flavors together and makes the sauce taste even better.
8. What dishes go well with this sauce?
This sauce is perfect for grilled chicken, roasted veggies, burgers, seafood, and even as a dip for fries or bread. You can also use it in pasta dishes for a spicy twist.
9. Can kids eat this sauce?
If your kids like spicy food, sure! But I’d suggest making a milder batch by using fewer chilies and maybe skipping the serrano altogether.
10. Do I need to strain the sauce?
Not at all. If your blender does a good job, it should be nice and smooth. But if you prefer a very fine texture, you can strain it through a fine mesh sieve.
Nando’s Peri Peri Sauce Recipe
Copycat Nando’s Peri Peri Sauce recipe made with fresh chilies, garlic, lemon, and smoky paprika. It’s bold, zesty, and perfect for adding a spicy kick to chicken, veggies, or anything you love. This easy blender sauce tastes just like the original—only fresher, simpler, and made right in your own kitchen.
Ingredients
- 1 medium yellow onion, roughly chopped
- 7 medium garlic cloves, peeled
- 6–8 bird’s eye chilies (red and green mixed) — adjust to your spice level
- 1 serrano chili (optional, but adds a nice deep flavor)
- 1 whole lemon, zest and flesh (peeled and seeds removed)
- 2 tablespoons tomato paste
- 1 tablespoon smoked paprika (try to use a good quality one)
- 1 teaspoon dried oregano
- ½ teaspoon dried rosemary
- 1 tablespoon dark brown sugar
- 1½ teaspoons salt
- ¼ cup white distilled vinegar
- ¼ cup water
- ⅓ cup neutral oil (like canola or sunflower)
Instructions
- Start by peeling and roughly chopping the onion. Peel your garlic cloves too. For the lemon, zest it first, then peel it and remove any seeds. Set everything aside.
- Now toss everything into your blender. That includes the onion, garlic, chilies, lemon zest and flesh, tomato paste, spices, sugar, salt, vinegar, water, and oil. Yup, all of it goes in together.
- Blend everything on high until it’s super smooth and creamy. You’re looking for a rich, thick texture that’s kind of a red-orange color. If your blender gets stuck, just add a splash of water or oil to help it along.
- Give it a small taste (careful, it’s spicy!). If you want more tang, add a little more vinegar. If it’s too spicy for you, a touch more sugar or oil can mellow it out.
- You don’t have to, but I like to pour the sauce into a small pan and let it simmer on low heat for about 3–5 minutes. It helps the flavors blend and makes the sauce a little thicker
Nutrition Information:
Serving Size:
1 tablespoonAmount Per Serving: Calories: 45Total Fat: 4.5gSodium: 150mgCarbohydrates: 2g
This nutritional information is an estimate based on ingredients used and typical portion sizes. Always double-check with your own ingredients and tools if you're tracking for health reasons.